These are so easy that the kids could make them. I know, I know, you're thinking, why would I make Mint Thins when I can buy a box of them for $4 at this time of the year.
Yes, but those are nothing like home made ones. Minty fondant that is soft and melts in the mouth. Fresh dark chocolate that you inhale the minute you open the cellophane wrapper that you've ensconced them in. An experience that is nothing like a supermarket purchased After Dinner Mint or Peppermint Pattie. I promise.
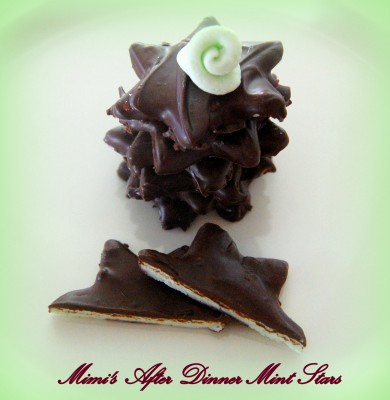
You can tint the fondant a pretty pastel green (or any other colour for that matter), or just leave it white.
They take about 30 minutes to prepare, and everyone gets to lick the dark chocolate of their hands when they're finished coating the shapes. Doesn't get much better!
My star cookie cutter is 5 cms from point to point.
To make at least 24 large star shaped mints....
You'll need:
200gms of ready prepared cake decorating fondant or equivalent quantity of home made fondant (It usually comes in a 600gm packet at the supermarket so one packet will make nearly 100 mints)
Peppermint essence
Dark chocolate melts
Icing sugar for dusting the bench
Baking paper or foil to rest the stars on, before and after coating them in chocolate
Rolling pin
Then just:
Dust the bench liberally with the icing sugar.
Take a tennis ball sized piece of fondant and knead for 30 seconds or so, until smooth and soft. Add the peppermint essence by adding it, half a capful at a time, flattening the fondant, making an indent in the middle, and dribbling the essence into the dent. Fold the fondant over the drizzled essence, and knead it again until smooth. Taste a pellet for minty-ness and add more peppermint essence if you wish.
To colour the fondant, dip a skewer or toothpick into some green food colouring and wipe it on the fondant, kneading the colour through well. Repeat until the desired colour is reached. Remember, you can always add more, but if it ends up Shamrock green because you put too much in at the beginning, there's not much you can do but save your mints for St Patricks Day....lol!
Dust the bench with icing sugar again. Roll the fondant out to your preferred thickness. You can have it Mint Pattie thick, or After Dinner Mint thin, or anything in between. Mine is about 3mm thick.
Use a small cookie cutter to cut shapes from the fondant, or cut freehand squares or diamonds with a sharp pointed knife. Place the shapes carefully on a sheet of foil or baking paper as you go. Use a knife or spatula to lift them carefully to preserve their shape.
Allow the fondant shapes to dry out for an hour or so.
Melt the chocolate in the microwave for about a minute on 50% power, remove and stir to dissolve any remaining lumps. Hold each fondant shape on the fingers of your non dominant hand, spooning the chocolate coating over the top surface and letting it dribble down the sides, covering it thoroughly. I don't worry about coating the underside. No one has noticed yet. Set aside on the baking paper or foil to set.
To package, stack, wrap in cellophane, adding a fondant rose made by simply rolling a strip of fondant into a coil, on top of the stack. To do this, take a pellet of fondant, shape into a nail file sort of shape, wider at one end and tapering to the other, and flatten. Roll it from the tapered end, to the wide end, forming a coil to shape the rose. Ta-da....pretty little rose to top your stack of Christmas Stars in their wrapping.
You can vary these by:
Adding strawberry essence and tinting the fondant pink by dipping a toothpick into pink food colouring to transfer the colour a little at a time, and kneading the fondant to distribute it. Coat in dark chocolate or even in white chocolate if you prefer.
Adding desiccated coconut and very finely chopped glace` cherries (scatter these across the fondant and knead them through) and covering in dark choc.
Adding orange essence, tinting the fondant orange by adding a little red and yellow food colouring, and coating in dark choc.
Adding maple syrup and coating in your preferred chocolate.
Very easy, yummy and inexpensive and looks like you've spent a fortune on hand made, gourmet choccies :)
Enjoy!
PS: Pair these with my home made After Dinner Mint Liqueur, and you'll have friends for life!

