
Who can resist those delectable, rich, butter and sugar laden cookies that come in Christmas themed tins?
I swear I don't crave them any other time of the year, but come December, I'm hankering for their vanilla scent and melt in the mouth texture. I love baking them with my daughter, and they scent the house with vanilla and butter for days on end.
This is a recipe I've used for a long time, and this year, I tried to use a cookie stamp to make them look a bit special. Well... I'm still coming to grips with that one, and meantime, I had a bunch of cookies that needed some TLC.
This particular recipe didn't lend itself well to the stamping which is a bit like the old thistle impressed onto shortbread, and whilst these tasted yum, they looked a bit demented.
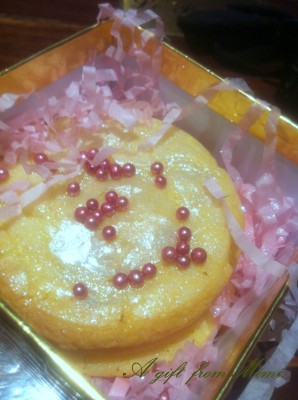
Well, I figured that since that edible pearl dust did the trick on my granddaughters birthday cake the other week, I'd do the same with the cookies. A bit of a dust with pearl dust, a little imaginative packaging, and we're all ready for gifting. Crisis averted.
Pretty pearl dust, lush ribbon, and shredded tissue cover a multitude of sins ;0)
Mimi's Pearlised Vanilla Butter Cookies
Makes at least 20
1/2 cup butter, softened
1 cup sugar (caster sugar is best)
1 egg, beaten
1 teaspoon vanilla essence or other flavour of choice
1 1/2 cups plain flour
1/2 teaspoon baking powder
Icing sugar or icing mixture to dust the bench when rolling out the dough
8 cm round cookie cutters
Lined cookie sheets for baking
Rolling pin
Decorations if desired. I used edible pearl dust and silver metallic cachous to sprinkle in the box
Then just:
Cream the butter and sugar till light and fluffy.
Add the beaten egg, and stir till combined.
Add the vanilla.
Add the flour and gently stir it in, folding the dough over to incorporate the flour. Use your hands to bring the dough together if necessary, smoothing it well.
Form into a ball and refrigerate for at least 2 hours.
The dough can now be frozen for up to a month for use closer to Christmas.
When you're ready to bake your Christmas cookies, preheat the oven to 180C.
Dust the bench and the rolling pin generously with the icing sugar or icing mixture, and taking small chunks to keep the dough manageable, roll the dough out to about a half centimetre thickness. You'll need to keep the bench well dusted with icing sugar or icing mixture, and you'll need to flip the dough over a few times to keep it supple and prevent it sticking to the bench. I don't usually try to roll out a piece any larger than four cookies worth at a time.
Cut the cookies out and use a spatula to place on the lined cookie sheets. Leave them plenty of space to spread or they'll be a demented shape like mine....lol!
Press some metallic cachous or sprinkles into the surface of the cookies now if you wish.
Bake the cookies for around 8-12 minutes until lightly browned at the edges and firm to touch. Allow them to cool on the trays.
Use a paintbrush to dust each cookie with a little of the pearlised cake decorating dust.
Wrap in cellophane treat bags or nestle in tissue lined boxes for gifting.
I like to top my little boxes with a lavish double satin ribbon, just to make them look extra special, but cookie bags, cellophane bags or even just cling wrap and lots of ribbon will do the trick too.
Pretty and pretty yummy too :)

