I suffer from Café` Avoidance Syndrome.
That's where I get really ticked off when I spend $6-$25 on a café` meal or treat, and leave wishing I hadn't bothered because the food is so mediocre.
We've all started calling it CAS and decided we need to resurrect all of our favourite recipes for Café` style treats.
It's generally agreed that we have a new excuse for NOT eating out....as in....'I'm sorry. I'd love to come to the horrendous, noisy food court for an overpriced morning tea, but I'm suffering from a severe episode of CAS'. Hopefully your friends will be sympathetic enough to come to you for yummy treats instead!
So here's a really quick, easy and impressive idea for little bite sized treats that needs nothing more than a batch of cake batter, some icing made with water and icing sugar and some pretty decorations, to wow everyone.
Cheats Petit Fours
Makes 30-40
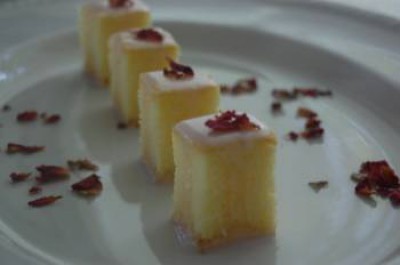
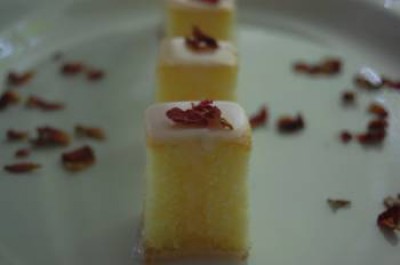
Petit Fours are little bite sized cakes, usually decorated with fondant in pastel colours and little embellishments like crystallised flowers, sugar roses, or delicate icing outlines. These are my quick version.
You need:
One batch of your favourite cake batter or one bought cake mix made according to directions
2 loaf tins, lined
4 cups icing sugar, sifted
8 tablespoons water
1 teaspoon flavouring eg vanilla essence, orange flower water, rosewater, coconut or almond essence
Pink, blue, green or yellow food colouring
Toothpicks
Baking paper
Decorations such as metallic or pearl cachous, edible flowers or flower petals, sugar flowers, or a piping bag with a small nozzle
Then just:
Divide the batter equally between the two loaf pans. The idea is to bake two thinner cakes, so if you don't have the loaf pans, just use a baking dish or lasagne dish, making sure you line it with paper overhanging at the ends so you can lift your cake out.
Bake until firm to touch in the centre, remove from the oven and allow to cool.
Sift the icing sugar to remove any lumps and mix it with the water and flavouring. Add the water bit by bit to get the icing the texture you need...runny but not watery. Dip in to the colouring of your choice with a toothpick, dunking the toothpick into the icing to impart the colour, to allow you to add the teeniest tiniest bit of colour bit by bit to get a delicate pastel shade. You can always add more, but it's nigh on impossible to make your colour lighter if you add too much colouring. You want it the lightest and palest it can be. Of course you can really tint them any colour you like, but they are more authentic done this way.
The icing should be a little runny, but not watery, as mentioned. If it's a little too runny, either add more sifted icing sugar, or alternatively use two coats of icing. If it's a little too stiff, add extra liquid, of course, but do it in drops. It's funny how icing can go from not quite runny enough to far too runny with one or two drops of water!
Remove the cooled cakes from the tins, and use a bread knife or serrated edged knife to square up the edges and smooth the top if need be. Usually the tops are nice and flat anyway as you've only barely covered the base of the tins with batter.You need nice neat little cubes of cake for this, so once the edges and top are squared off and neat, cut the cakes up. As a general rule, look at the height of the cakes and try to cut the crosswise slices about that width. My bread knife is the right width on most occasions so I use that as my measuring guide. Usually two cuts lengthwise along the loaf, and five or six crosswise gives neat, even cubes.
Spread a long sheet of baking paper on your bench or table and line up all the little cake cubes.
Using a teaspoon, quickly spoon the icing over each little cube. Alternatively, use a small jug to pour the icing over them. The icing will run down the sides adding a bit of colour, but won't cover them completely as in 'real' petit fours. But they'll be pretty nonetheless.
Allow the icing to cool and harden whilst the cakes are still on the baking paper.
When the icing is set, decorate each little cake as you wish. I love the little pearlised cachous or even those tiny heart shaped sprinkles, but my favourite is edible rose petals. I buy these from The Tea Centre website, and you get the most enormous amount, and I mean thousands and thousands, for about $4. I put them in shortbread and iced herbal teas, and freeze them in ice cubes. So pretty.
You can use your own rosepetals, so long as they aren't sprayed. Just dry them in the microwave first. To dry rose petals for kitchen use, spread the petals on a paper towel in the microwave and microwave them on HIGH for 4 minutes. Leave them out in a cool dry place for 3-4 days and store them in an airtight container.
The rosepetals used with rosewater flavouring and tinted palest pink as I've done them here, are a treat worthy of any posh 5 star hotel High Tea, never mind a coffee at home with friends.
If you don't have any of those things on hand, make up another batch of runny icing and leave it white. Then either use a teaspoon dipped in the icing to flick back and forth over the cakes to create artistic squiggles, or use a piping bag with a tiny, tiny nozzle, to pipe dots, hearts, stripes or flower shapes on to the top of each little cake. A ziplock bag with a teeny corner snipped off will do in a pinch.
And that's it. Petit Fours all posh and pastel and pretty, and all for the price of a cake mix and a bag of icing sugar.

