Here's my Coco Chanel inspired luxury coconut ice, which I am gifting for Christmas this year. Who says Coconut Ice has to be pink!
It's a fairly standard coconut ice recipe that I've had for decades, and if you have your own version then, by all means use that instead. It's the decorating that makes this one special. It's also important to cut the coconut ice into slabs rather than the traditional squares just to make it look a bit more grown up.
Each slab costs around $3-$8 depending upon how much gold leaf and how many roses you use to decorate it.
You'll need:
(This will yield about 6 slabs as pictured)
125gms Copha (1/2 a block)
1 x 500gms packet icing sugar, sifted
1 x 250gm packet dessicated coconut
2 egg whites, whisked in a cup with a fork until they're foaming around the edges. This takes no more than a minute.
2 teaspoons black gel food colouring (available at cake decorating suppliers for about $6-$7)
1 sheet edible gold leaf (also available at cake decorators for about $7 a sheet)
One large soft artists brush or a pastry brush
Small fondant roses, either made by hand if you're a bit clever, or purchased at the supermarket in the baking aisle or at cake decorators.
Greaseproof paper to wrap or you can use baking paper.
Wide craft ribbon or satin or organza ribbon to tie around it.
1 cake tin or slice tin 20cm x 20cm, lined with baking paper, with some overhanging the edges of the tin so you can lift the coconut ice out easily
To make:
Melt the Copha in a small microwave bowl on HIGH until just barely melted and allow to cool slightly.
Put the sifted icing sugar and coconut in a large bowl and stir to combine. Add the cooled melted Copha and the whisked egg white and combine well.
Press half of this mixture into a thin layer on the base of your lined tin. Clean wet hands will help smooth the surface and a fondant smoother is great if you have one, just to really press it flat and into the corners.
Now add the 2 teaspoons of black food colouring to the other half of the coconut ice left in the bowl. Make sure you mix it really well, stretching it out with the back of a spoon and stirring it back in, a bit like kneading with a spoon, to be certain there are no white flecks left.
Smooth this over the white layer with clean hands and the back of a spoon to even it out.
Chill for an hour, then loosen the coconut ice with a thin knife around the unlined edges, and carefully lift it out. Cut into six even slabs.
Tear off an 8 cm wide strip of greaseproof or baking paper and fold it in three, finishing the seam underneath. Trim it to fit around your slab. Cut a length of ribbon about 15-30 cms long and have it ready, set aside.
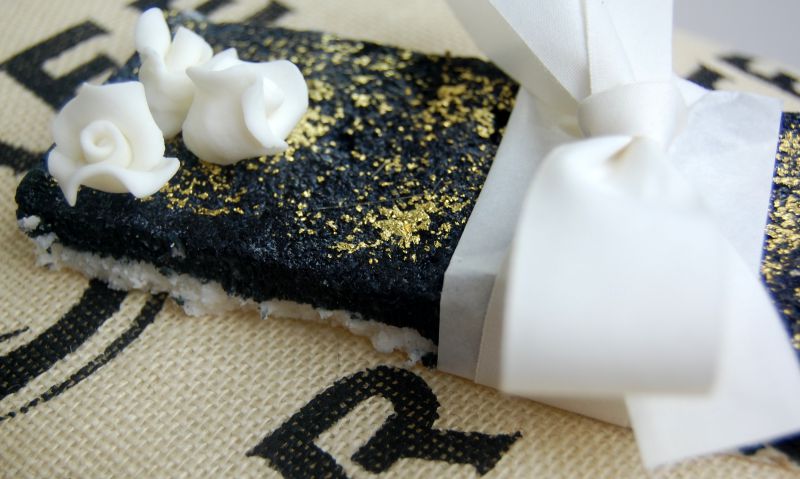
Take one sheet of edible gold leaf and place it face down on the black upper side of your coconut ice. Using the brush, rub in circles, on the back of the sheet of paper attached to the gold leaf, to encourage the gold leaf to adhere to the surface of the coconut ice. Continue to do this, using up as much of the gold leaf on the sheet as you can, until you're happy with the amount on the top of your coconut ice.
Add the roses in one corner. If you've bought them from the cake decorator, they'll be on a stem which you can simply cut to length and stab into the top of the coconut ice. If they're supermarket or home made, you'll need to adhere them with a bit of icing.
Wrap the folded length of greaseproof paper around one end of the bar of coconut ice, and tie it in place with the length of ribbon.
You can now lay it on platters for the table, or wrap it in lace, or cellophane or a box for gifting.
Very pretty, and even blokes love it!

