Simple Savings Newsletter - July 2018
- Practically Nude
- Scary Spices
- Finding Ingredients
- Competition: Ideas for Spinach and Pork
- Quiz: How Nude Are You?
- Thermomix, Bloody Thermomix!
- Impress the Chef
- June Winners: Warming Up For Winter
- Puppies!
Hello,
How are you going? I hope you are doing well. Earlier this year one of my young and single girlfriends asked me, "How much time do you spend in the kitchen?" After looking puzzled for a bit, I replied "I don't know. Why?" "It is like you spend your whole life cooking. My image of you is a person who cooks all day and all night."
Her comment really surprised me and that night I worked out I was spending 25+ hours a week preparing food for my five humans, one teen and four dogs. Since then I have been on a quest to reduce the amount of hours I spend preparing food (Cooking, cleaning, shopping, planning) without increasing the costs or lowering the quality.
In this newsletter I'm going to share this journey with you.
I hope you find it handy.
All the best,
Fiona
P.S. The new site is even closer than it was last month. My husband, Matt, is hoping to switch them over while no one is looking.
1. Practically Nude
All this year I have been having fun with my own brand of Practically Nude eating which is high nutrition, low cost, convenient and low on plastic. Most people think this is impossible; that cheap food is unhealthy, time consuming and bad for the planet. They are wrong.
I'm going to show you how we eat well while keeping the costs and my time in the kitchen low. I do it by shopping smart, cooking large batches, loving my freezer and re-arranging my cupboards.
Shopping smart is the key
When I say 'shopping smart', I don't mean following the latest Coles catalogue or getting dragged into Surprise Buys at Aldi. 'Shopping smart' means doing your research and finding ways to consistently buy low priced high quality ingredients in your area.
For example, 18 months ago when meat prices skyrocketed I shopped around and found a place to regularly buy pork roasts for $4 per kilo. (Meat City, in Morayfield)
When we first moved to Buderim I found a brilliant place for fruit and vegetables. At the moment, they are selling their store grown silverbeet for $2 a bunch. (Erbachers)

Cooking Large Batches
Making double, triple or quadruple quantities of a dish saves time and energy. It makes life easier. I can make three night's dinner in little more time than it takes to make one. It is really satisfying.
Loving My Freezer
When eating meals from the freezer all you have to do is defrost, add some fresh veggies and herbs or seasoning and re-heat. It is so easy.
If a new freezer isn't in your budget, hunt around Facebook and Gumtree. Last month I bought a second hand 300L upright freezer on Gumtree for $150 and gave my small chest freezer to a friend.
Re-organising Your Kitchen
Making your kitchen more efficient is a great way to save time. This year I have re-arranged everything in my kitchen cupboards to make ingredients easier to find and reach, and reduced my time spent cooking. Read on for the details.
2. Scary Spices
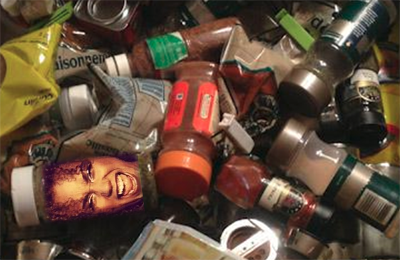
My old spice box used to look a lot like this. Messy, unorganised and downright scary. Digging through it to find spices was a massive waste of time. The trouble is, my kitchen is really small and I couldn't think of a better way to store my spices.
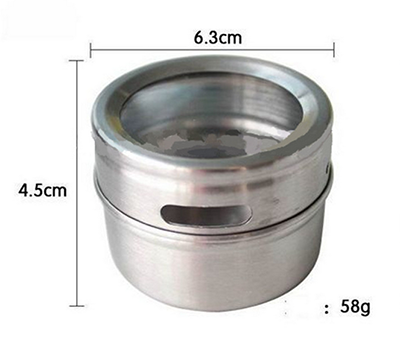
One day I was staring at the blank space on the side of my fridge and thought; "If only I had magnetic spice containers. I could line them up in alphabetical order on the fridge and never have to dig through my scary spice box again."
After some searching (and a few fails), I found magnetic spice containers for $1.86 each including delivery.
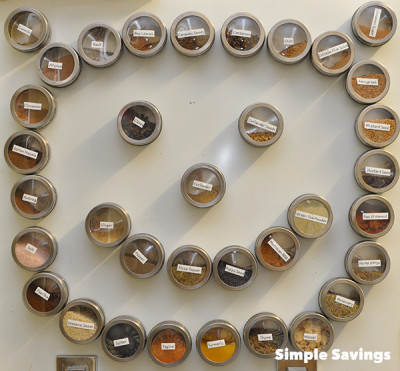
I bought a pile of containers, made some quick labels and here is the result:

Woohoo!! Now I can find the spice I need in a couple of seconds and have reduced my cooking time for almost every meal. The only problem is the spice containers do not stay in rows for long. My kids like to move them around and pop things in them. Sometimes, they look like this:
But even that is far better than my scary spice drawer.
I love my new spice rack, it inspired me to attack my ingredients cupboard...
3. Finding Ingredients
The other way I was wasting massive amounts of time was in finding ingredients. This is how my ingredients cupboard used to look:
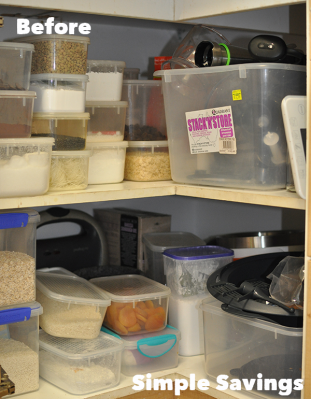
A massive wall of containers which all look the same. Every time I wanted to find something I had to hunt my way through. Pulling out and inspecting the containers was a huge time waster.
I have tried quite a few labelling systems over the years, but they all had problems.
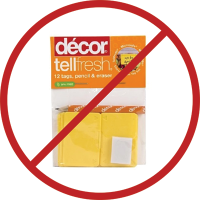
The Decor 'tellfresh' are hard to read. They had a long chat with my bin.
My label maker was a fail because the labels were hard to remove and it lacked flexibility.

The stickers I found online were fails because they are all the same colour.
...or changed colour for no apparent reason.

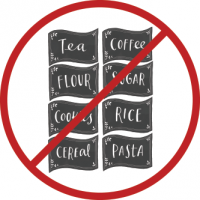
Also the range of available ready-made ingredient labels was tiny. Our diet means I use lots of ingredients no one made labels for.
The system I had been using was to cut the label off the packet and put it inside the container:
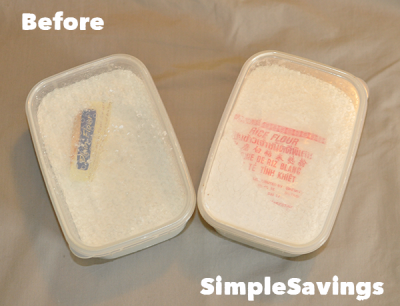
This works, but is really inefficient and I was still spending ages looking for ingredients.
It was time to invent my own colour coded, flexible, efficient, long lasting, time-saving labelling system. It needed to be:
- Easy to use
- Easy to read
- Easy to clean
- Easy to remove
- Easy to maintain
- Flexible
- Long term
- Affordable
Most of all, it must reduce the overall time I spend in the kitchen.
I wanted something in which you can invest a few hours now which will reduce the amount of time you spend cooking each and every week for many years.
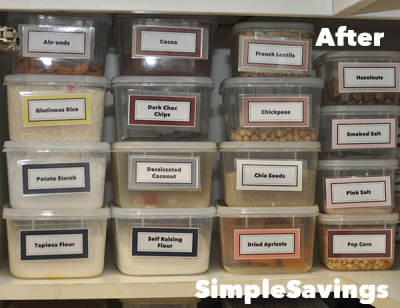
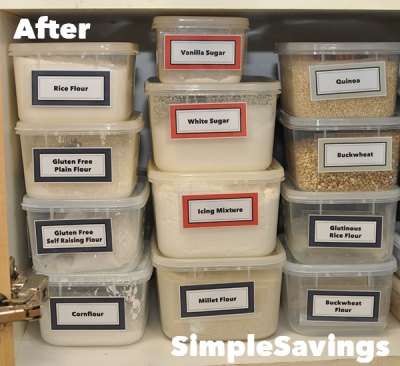
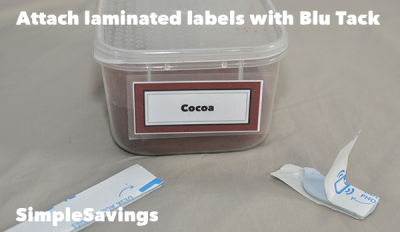
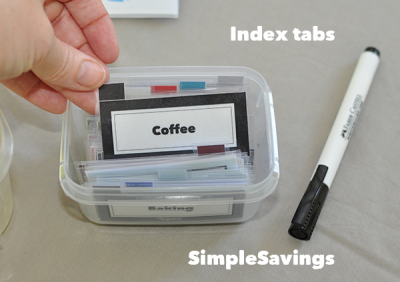
The solution is a laminated, colour coded, Blu-Tackable labels.
The lamination makes them long lasting, easy to clean and suitable for a whiteboard marker.
Colour coding them into the categories made the ingredients easier to find at a glance.

Now my baking ingredients are easy to grab at a glance. If I'm after flour, I skim the dark blue labels. If I want rice, I skim for bright yellow. If I want chocolate I skim for a dark brown label. Colour coding the labels makes finding the ingredient I need much faster.
The labels are attached and removed quickly with Blu Tack.
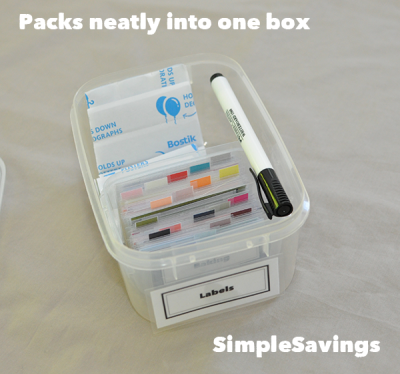
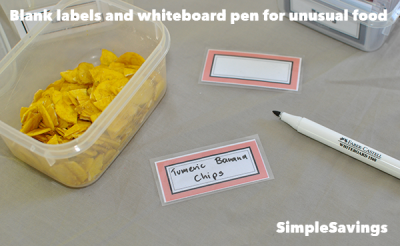
All the spare labels are stored in one box with the Blu Tack and a whiteboard marker.
The whiteboard marker is for writing new labels for unusual ingredients.
The system even has index tabs so labels are easy to find and put away.
I have been using and improving this system for a few weeks and I absolutely love it! It is saving me time every time I cook.
You can download the whole system to print out, laminate and install in your kitchen, it is free to download until the end of July.
After that it will become a Members-only treat. If you are not yet a Vault member, it costs a tiny $27 per year.
4. New Competition: Ideas for Spinach and Pork
Buying pork roasts for $4 per kilo and silverbeet for $2 a bunch is fantastic, but I'm running out of ideas for new dishes. This month we are giving away $100 for the best pork recipe and $100 for the best silverbeet recipe. We are also awarding four $50 prizes for best tips for using silverbeet and/or pork.
To enter, send in your story by July 30th. Email your entries to: competitions@simplesavings.com.au
5. Quiz: How Nude Are You?
July is the perfect time to sit our nudity test. The nude food quiz takes only a minute and evaluates your shopping and eating choices to help you work out "How nude are you?"
6. Thermomix, Bloody Thermomix!
My friends have been nagging me to get a Thermomix for years. Even though these are my good friends, and I trust their advice and purchasing decisions for so many other items, I'm cynical when it comes to the Thermomix.
My resistance has been mostly to do with 'commitment bias'. You see, the more money, time and energy you invest in something, the more likely you are to think positively of your choices. Basically, a Thermomix is a huge investment and no one wants to admit they made a $2,000 error, so they would tend to shout its praises even if it sucked. The other reason I don't trust Thermomix praise is their business structure rewards people for saying nice things about them.
The upshot of this was that every time someone said anything nice about a Thermomix, I treated the information as untrustworthy. Or, as one of my other friends said: "Stop telling me about your bloody Thermomix!".
When my friends bugged me to get one, I would explain that I have a good blender, stand mixer, stick mixer, stove top, and plenty of helpers, I don't need or want a Thermomix.
Well, in the last six months my blender broke, my stick mixer broke and my stand mixer has been making frightening sounds. I decided it's time to try one of these blasted Thermomix things! I'll test it out for a month, I figured, and if it doesn't make a solid contribution in my kitchen, I'll sell it on. No real risk. If it is brilliant I'll keep it. If it's poor to average, I'll sell it.
Of course, there was no way I was going to pay full price! Are you kidding me?!
After a bit of shopping and quite a bit of research I concluded that a Thermomix is a very complicated machine, and fixing a broken one is not worth attempting. I found you can sometimes buy them unopened, with warranty, on Gumtree. A new one costs $2,089 from Thermomix. Unopened Thermomixes on Gumtree range from $1,650 to $1,900.
Four weeks ago I bought an unopened Thermomix for $1,700 with 17 months warranty.
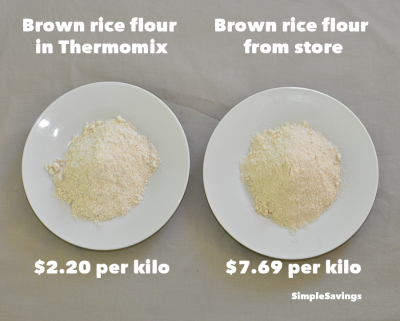
You may not know this but I haven't eaten gluten or lactose for 20 years. Neither does my constantly hungry 16 year old son, Sam. This means I have endured awful or ridiculously expensive bread. I have tried every gluten free bread mix on the market. I paid $7.69 per kilo for brown rice flour and $25.26 per kilo for almond meal. If I'm feeling really kind I buy Sam's favourite Zehnder White Gluten Free Potato Bread for $12.12 per kilo.
Since getting the Thermomix that has all changed.
I now buy brown rice for $2.20 per kilo and make my own Brown Rice Flour. Saving $5.49 per kilo.
(We would have to eat 310 kilos of brown rice flour to recoup the cost of my second hand Thermomix.)
The other reason I'm so impressed with the brown rice flour is while brown rice is really easy to get, brown rice flour is one of those ‘difficult to buy’, ‘special trip’, ‘up to $17 per kilo’ ingredients only sold at health food shops. Being able to mill my own instead of making a special trip to the shop is a big time saving.
With the Thermomix I am now making gluten free bread which is tastier than Sam’s favourite $12.12 per kilo bread, for $2.40 per kilo. Saving $9.72 per kilo. (I'll tell you more about that in another newsletter.)
I'm saving $12.34 per kilo on almond meal by buying almonds (skin still on = more fibre) for $12.92 per kilo and milling them instead of buying blanched (skinless) almond meal for $25.26 per kilo. If you doubt the importance of almond meal, then you need to try my favourite chocolate cake recipe, in the next section. :-)

So the Thermomix can mill stuff. It does many other things too. For example, we have weaning puppies here at the moment, and making puppy food in the Thermomix is a heck of a lot faster than what I was doing before. The Thermomix is saving me money and time.
My friends were right and it is time for me to eat humble pie (made in the Thermomix, I guess). Our diet means I should have bought a Thermomix years ago when they suggested it. Not having one has been costing me money and time.
I'm keeping the Thermomix. It passed the test.
7. Impress the Chef
If you are wondering what I do with so much Almond meal, a lot of it goes into a cake my chef brother-in-law recently declared is "the best chocolate cake I have tasted in ages."

This cake tastes so good no one will suspect it is gluten free and dairy free.
Ingredients
- 1 tsp bicarb soda
- 100 grams cocoa
- ½ tsp salt
- 300 grams almond meal
- 400 grams caster sugar
- 2 tbsp vanilla sugar
- 300 ml olive oil
- 250 ml water
- 6 large eggs
Method
- Pre-heat oven to 180 degrees
- Grease and line a large cake tin or two medium cake tins
- Grab a medium bowl, large bowl and a sifter
- The large bowl is for your dry ingredients
- Sift bicarb, cocoa and salt into large bowl
- Add caster sugar, vanilla sugar and almonds to large bowl and mix
- In the other bowl, mix olive oil, water and eggs
- Add the wet ingredients to the dry ingredients and mix well
- Pour into cake tin and bake for an hour
(The cream on top of the cake in the photo is Lactose free. The chocolate on top of the cake is gluten and dairy free. This recipe has been adapted from Nigella's Olive Oil Chocolate Cake.)
8. June Winners: Warming Up for Winter
Last month's entries to our "Warm Up for Winter" competition were fantastic. Simple Savers are very clever, good hearted people. Our winner was Jenine, who has been on a mission to stay warm while lowering her bills, followed by Susan Z who is on the same mission, and forum regular Clutterhen whose story is so gorgeous it makes me wish I was one of her children. Congratulations Jenine, Susan and Clutterhen. Here are their entries. I hope you enjoy reading them as much as I did.
The winner is Jenine B
I have been on a mission to reduce our heating costs and have some great tips to share.
We have a wood heater and I looked at making paper bricks but it seemed too messy, labour intensive, time consuming and it is recommended that you buy a special brick making tool. Instead, I've come up with a simple and quick way to use materials around the house to make the wood go further. I cut up empty toilet rolls into mini tubes and then roll up old documents, office paper and newspaper (not glossy paper or paper with a lot of printed colour) and insert them into the tubes. The result is like this.
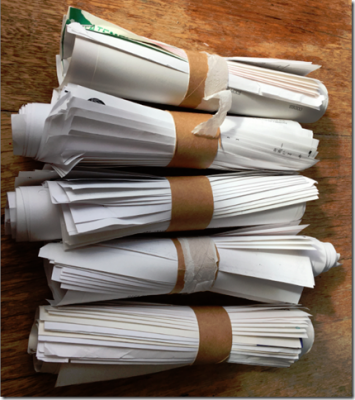
These mini logs don't last as long as wood but they can be made very easily and last much longer than scrunched up paper.
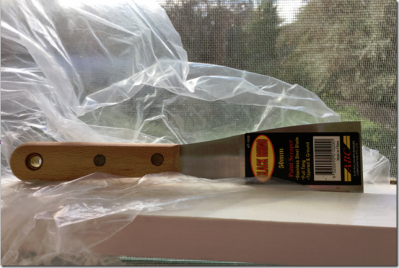
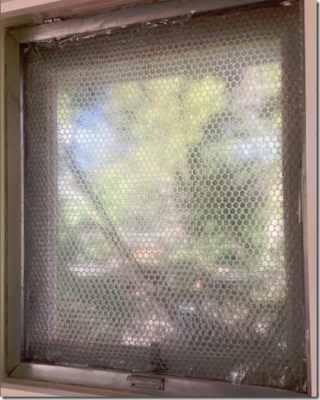
We have draughty old double hung windows. On the internet you can find a number of videos showing how to use plastic wrap and a paint scraper to easily stop the draughts by pushing the plastic gently into the cracks all around the window until the draft is sealed and the plastic cannot be seen. Instead of plastic wrap, I’ve been using waste plastic from packaging so it is completely free.
I also use bubble wrap on windows that I don't need to look out of. For bubble wrap double glazing, you simply cut the bubble wrap to the size of the glass, spray the window with water and place the bubble wrap onto the glass. It will usually stick and stay there - some of my bubble wrap has been on the windows for a couple of years now. It still lets the light in too. You can find detailed instructions on the internet by searching for "bubble wrap double glazing."
Our old house has a number of vents high up in the walls where a lot of heat was escaping to the outside. These vents were designed in the times where heating was usually from open fires and unflued gas heaters. If you don't have either of these types of heating it is worthwhile closing them off. To do this, I simply used an old bucket of plaster type filler I found in the garage and filled in the holes. You can still see the vents but I think they have a bit of character so I don't mind that.

A couple of years ago, I purchased Heat Saver Vent Covers from a Queensland manufacturer. These great covers are made to order and cover evaporative cooling vents during winter to stop heat from escaping. They attach using a white magnetic strip which is virtually invisible on the vent when the cover is off. You simply hold the cover close to the vent and it attaches and it is just as easy to remove. I have added bubble wrap into the covers to further increase the insulation value.
I hope these tips provide some ideas for Simple Saver members. They have certainly made a difference to our heating bills!
Jenine
The first runner up was Susan Z. She has these tips to drop her power bill by 70%.
Use electric blanket and electric throw blankets in the evening rather than heating the bedrooms. It uses less power to keep you warm.
Use power saving solar lights in the evening, they can be wall mounted or attached to a bedhead or even hooked on the current lamp, it goes in or near the window during the day to recharge, there are lots of types out there, and yes, they are bright enough to read with. Just make it a part of your going to bed or getting up routine to put them to charging. (this can be used all year, but it helps subsidize the extra electricity cost of heating in winter or cooling in summer)
Use sensor lights and the most cost-efficient globe for the purpose in such rooms as bathroom, toilet, stair well or hall. These lights can often be left on unintentionally, raking up a hefty power bill.
Making sure linen and bedding is appropriate to the time of year can prevent the use of heating overnight, using timers, sensors etc on heaters is a great way to only heat the house when you need. Most modern heaters can be set to come on and turn off at particular times. For example, if you don't like getting home from work to a cold house, set it for 20mins before you're due home and to turn off 20mins before 'bed time'.
Adopt a policy of 'if you are cold, have you got on a jumper/socks/slippers/dressing gown, shut windows/curtains/doors etc' before turning on or turning up a heater.
Turn it off at the switch, have electronics set up on power boards that can be turned off at the switch early when not actually in use, they drain a lot of power even when the appliance if turned off, anything with a light to show it has power to it, is using power!

My family has implemented these simple steps, here is our last power bill to show the difference it can make
The next runner up was forum regular, Clutterhen. I love the heartwarming way she keeps her bills low.
In the colder months when we get home from school and work we keep moving to get all of our jobs done as soon as possible. We cook dinner if it hasn't already been precooked. Baths and teeth brushed early so everyone can settle in Mum's bedroom which is the only room in the house where we use heating. Mum's room was chosen as it has the biggest bed but any room is good.
I warm the room about 30-60minutes before we head in there. Once in the room, homework, study, work paperwork, reading, TV, movie, crochet etc are done together in mum's bed staying warm under the doona. Sometimes chairs and trolley table are brought in if someone wants it.
I also make hot chocolate or tea and something warm like a toastie if supper is wanted.
This saves on electricity and encourages warmth among us by being closer together as a family.
9. Puppies!
Earlier I mentioned we are weaning puppies at the moment. Even though this has nothing to do with saving money, I thought you might like to see some puppy photos.
The first one is the little boy when he was four weeks old.

The next is of Elora keeping the puppies company. She is reading on the iPad while the puppies crawl all over her.

The last photo is of the puppy trying to bite Jacqui's thumb. He is teething.

Can you tell the puppies get a lot of love in our house?
Before anyone asks; these puppies are not for sale. They already have beautiful homes to go to. The children aren't for sale either. I'm definitely keeping the children... Unless I get a really good offer on my sixteen year old. Selling him would help me on this quest to drastically reduce the time I spend in the kitchen.
Till next month...
Many grins,
Fiona

